Sencha Cmdを使ったアプリの生成とその構成
コマンドラインでアプリのひな形を作る
前回、Sencha Touchのインストールまでを解説したので、今回は実際にSench Cmdを使ってアプリのひな形を生成してみます。ターミナルを開き、Sencha Touchライブラリーを配置したディレクトリに移動します。そして、次のようなコマンドラインを実行してください。
$ sencha generate app MyApp ../MyApp
また、ダーッと色々出力されますが、最後に「[INF] generate-app:」というのが出れば成功です。最初の引数「MyApp」はアプリ名です。プログラム内ではアプリ固有の名前空間として扱われます。2つ目の引数「../MyApp」はひな形を生成する階層とディレクトリ名を示しています。ここではSencha Touchライブラリーと同じ階層に作成しました。
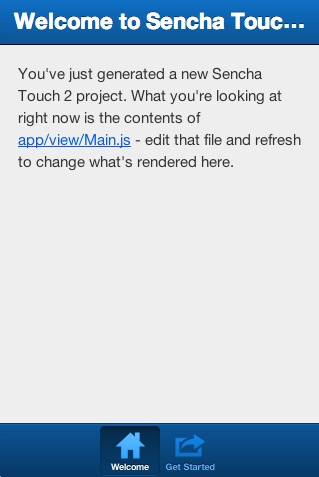
これだけでアプリの骨組みが完成です。ファイルの生成やフォルダの配置が自動的に行われています。中身を見て行く前に、とにかくブラウザで最初のアプリを見てみましょう。アプリを生成したアドレスにアクセスしてみます。ローカルの場合は大抵「http://localhost:8888/MyApp」とかです。下図のように表示されればひとまず成功です。
アプリの構成
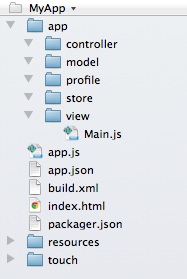
生成されたMyAppフォルダの中身を見てみると以下の様な構成になっています。
- appフォルダ- アプリのメインプログラムを入れていくフォルダです。すでに
viewやcontrollerフォルダが作られており、画面表示を担うプログラムをviewフォルダ、イベント操作を行うプログラムをcontrollerフォルダに入れていくことでMVC構造を実現します。 app.js– アプリの起動時にまず読み込まれ、実行されるJavascriptファイルです。app.json– アプリの構成ファイルです。スタイルシートやjsファイルのパスなどが記述されています。build.xml– ビルドの際のオプションが設定できるっぽいですが、よくわかりません。index.html– アプリの大本となるHTMLファイルです。この中にJavascriptでアプリの中身が生成されます。packager.json– パッケージ化する時にSencha Cmdで使用する構成ファイルです。resoucesフォルダ – CSSや画像を置いておくフォルダです。touchフォルダ – Sencha TouchのJavascriptファイルなどが配置されているフォルダです。
実際アプリを作っていく際によくいじるのはapp.jsとappフォルダです。
アプリ実行の流れ
アプリを作っていく上でやはりどのように実行されているのかを理解しておく必要があるでしょう。簡単にここで解説します。
index.html
アプリといっても結局はウェブページなのでまずはindex.htmlを見ていきましょう。index.htmlをエディタで開いて見てください。
<!DOCTYPE HTML>
<html manifest="" lang="en-US">
<head>
    <meta charset="UTF-8">
    <title>MyApp</title>
    <style type="text/css">
         /**
         * Example of an initial loading indicator.
         * It is recommended to keep this as minimal as possible to provide instant feedback
         * while other resources are still being loaded for the first time
         */
        html, body {
            height: 100%;
            background-color: #1985D0
        }

        #appLoadingIndicator {
            position: absolute;
            top: 50%;
            margin-top: -15px;
            text-align: center;
            width: 100%;
            height: 30px;
            -webkit-animation-name: appLoadingIndicator;
            -webkit-animation-duration: 0.5s;
            -webkit-animation-iteration-count: infinite;
            -webkit-animation-direction: linear;
        }

        #appLoadingIndicator > * {
            background-color: #FFFFFF;
            display: inline-block;
            height: 30px;
            -webkit-border-radius: 15px;
            margin: 0 5px;
            width: 30px;
            opacity: 0.8;
        }

        @-webkit-keyframes appLoadingIndicator{
            0% {
                opacity: 0.8
            }
            50% {
                opacity: 0
            }
            100% {
                opacity: 0.8
            }
        }
    </style>
    <!-- The line below must be kept intact for Sencha Command to build your application -->
    <script id="microloader" type="text/javascript" src="touch/microloader/development.js"></script>
</head>
<body>
    <div id="appLoadingIndicator">
        <div></div>
        <div></div>
        <div></div>
    </div>
</body>
</html>
バージョンによっては多少違うかもしれません。色々コードが書かれていますが、基本的にはほとんどローディング用に書かれているものです。実際、以下のようにコード消してみても動きます。
<!DOCTYPE HTML>
<html manifest="" lang="en-US">
<head>
    <meta charset="UTF-8">
    <title>MyApp</title>
    <!-- The line below must be kept intact for Sencha Command to build your application -->
    <script id="microloader" type="text/javascript" src="touch/microloader/development.js"></script>
</head>
<body>
    <div id="appLoadingIndicator">
    </div>
</body>
</html>
が、Senchaライブラリーの読み込みに時間がかかることもあるので、ユーザーを不安にさせないためにもローダーは残しておくほうが良いかと思います。
app.json
次に読み込まれるのがapp.jsonです。中身を見てみましょう。
.
.
.

    "js": [
        {
            "path": "touch/sencha-touch.js",
            "x-bootstrap": true
        },
        {
            "path": "app.js",
            "bundle": true,  /* Indicates that all class dependencies are concatenated into this file when build */
            "update": "delta"
        }
    ],
.
.
.

    "css": [
        {
            "path": "resources/css/app.css",
            "update": "delta"
        }
    ],
このような感じで、jsファイルやCSSファイルのパスが記述されているのがわかります。このファイルがあるおかけで、index.htmlにスクリプトファイルのパスを記述しなくてもいいのです。(逆に、普通のウェブページのようにindex.htmlに記述してもよい。)
上のコードの7行目を見ると、まずsencha-touch.jsでSencha Touchのライブラリーを読み込んでいます。そしてその次にapp.jsが読み込まれています。これが要はアプリの中身の大本になるファイルです。ということで次はapp.jsを見てみましょう。
app.js
app.jsを開くと、バージョンによって差異はあるかもしれませんが、以下のようになっています。
//<debug>
Ext.Loader.setPath({
    'Ext': 'touch/src',
    'MyApp': 'app'
});
//</debug>

Ext.application({
    name: 'MyApp',

    requires: [
        'Ext.MessageBox'
    ],

    views: ['Main'],

    icon: {
        '57': 'resources/icons/Icon.png',
        '72': 'resources/icons/Icon~ipad.png',
        '114': 'resources/icons/Icon@2x.png',
        '144': 'resources/icons/Icon~ipad@2x.png'
    },

    isIconPrecomposed: true,

    startupImage: {
        '320x460': 'resources/startup/320x460.jpg',
        '640x920': 'resources/startup/640x920.png',
        '768x1004': 'resources/startup/768x1004.png',
        '748x1024': 'resources/startup/748x1024.png',
        '1536x2008': 'resources/startup/1536x2008.png',
        '1496x2048': 'resources/startup/1496x2048.png'
    },

    launch: function() {
        // Destroy the #appLoadingIndicator element
        Ext.fly('appLoadingIndicator').destroy();

        // Initialize the main view
        Ext.Viewport.add(Ext.create('MyApp.view.Main'));
    },

    onUpdated: function() {
        Ext.Msg.confirm(
            "Application Update",
            "This application has just successfully been updated to the latest version. Reload now?",
            function(buttonId) {
                if (buttonId === 'yes') {
                    window.location.reload();
                }
            }
        );
    }
});
上から見ていきましょう。まずはパスを設定しています。
Ext.Loader.setPath({
    'Ext': 'touch/src',
    'MyApp': 'app'
});
このsetPathを設定すれば、アプリに'MyApp'と書かれている部分は、'app'フォルダを見ろという命令をすることができます。例えば、app.js内に以下のような記述があります。
.
.
.
    requires: [
        'Ext.MessageBox'
    ],
.
.
.
    Ext.Viewport.add(Ext.create('MyApp.view.Main'));
これらが読まれた時アプリは'Ext'を'touch/src'と読み替えるので、/touch/src/ディレクトリにMessageBox.jsを探しに行きます。そして、10行目で'MyApp'は'app'に読み替えられ、アプリは/app/view/ディレクトリにMain.jsを探しに行きます。
その下からがメインのアプリケーションの設定になります。アイコン画像の設定や、名前空間などが書かれていますが、実際にアプリを起動しているのは、以下の部分です。
    launch: function() {
        // Destroy the #appLoadingIndicator element
        Ext.fly('appLoadingIndicator').destroy();

        // Initialize the main view
        Ext.Viewport.add(Ext.create('MyApp.view.Main'));
    },
ここではまず、初めに表示していたローダーを削除しています。そして/app/view/Main.jsで定義されているクラスのコンポネントを作成し、Viewportに追加しています。Viewportとは、index.htmlのbodyの部分だと考えてもらえればいいかと思います。
とにかくこのようにSenchaのアプリは実行されています。