BanchaとSencha Touch 2を統合する – Senchaファイルの設定と配置
前回、CakePHPとBanchaのインストールを行いました。→「CakePHPとBanchaのインストール」
今回はここへSencha Touch 2を配置し、MVCモデルを実現します。
参考サイト
- Bancha for Sencha Touch 2 (Screencast)
- BanchaTouchClient (github)
Sencha Touch 2のソースもダウンロードしておきましょう。→Senchaダウンロードページ
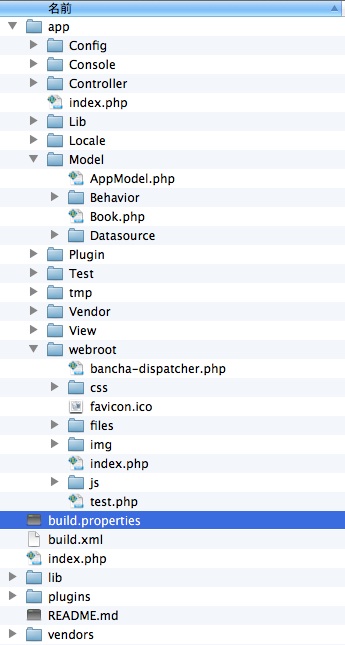
フォルダの構成とデータベース
前回のプロセスを引き継いでやって行きたいので、前回作成した、bancha-supersimpleデータベースのbooksテーブルと、プロジェクトフォルダcake_test01を用います。以下の様な構成になっていると思います。
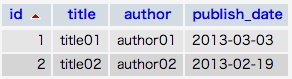
テーブルには2つの要素をサンプルとして入れています。
作成するアプリは「Bancha for Sencha Touch 2」のサンプルアプリです。これを少々改良して、MVC構成にし、データも上のbooksテーブルから引っ張ってくるようにしたいと思います。
Senchaファイルの配置
オリジナルコードはRolandsさんがBanchaTouchClientで公開しています。
ここのディレクトリを見ると、app.jsやindex.htmlがあるので、ここが今回のwebrootにあたると考えていいでしょう。
BanchaTouchClient/app.jsとBancha/TouchClient/index.htmlを ローカルにダウンロードし、/Applications/MAMP/htdocs/cake_test01/app/webroot/直下に配置します。 index.htmlを開いてみましょう。
<!DOCTYPE HTML>
<html manifest="" lang="en-US">
<head>
    <meta charset="UTF-8">
    <title>Bancha for Sencha Touch 2</title>

	<!-- configure display for mobile devices -->
    <meta name="viewport" content="width=device-width, initial-scale=1.0, maximum-scale=1.0, minimum-scale=1.0, user-scalable=no">
    <meta name="apple-mobile-web-app-capable" content="yes">
    <meta name="apple-touch-fullscreen" content="yes">

	<!-- load Sencha -->
	<link rel="stylesheet" href="sencha-touch/resources/css/sencha-touch.css">
	<!--IFDEBUG -->
	<script type="text/javascript" src="sencha-touch/sencha-touch-all-debug.js"></script>
	<!-- ENDIF -->
	<!-- IFPRODUCTION
	<script type="text/javascript" src="sencha-touch/sencha-touch-all.js"></script>
	ENDIF -->

	<!-- load Bancha -->
    <script type="text/javascript" src="../Bancha/js/Bancha.js"></script>
    <script type="text/javascript" src="../bancha-api/models/all.js"></script>

	<!-- start the app -->
    <script type="text/javascript" src="app.js"></script>

	<!-- add some styling -->
	<link rel="stylesheet" href="resources/css/app.css">
	<link href='http://fonts.googleapis.com/css?family=Droid+Serif:regular,bold' rel='stylesheet' type='text/css' />

</head>
<body>

<script type="text/javascript">var _gaq=_gaq||[];_gaq.push(["_setAccount","UA-10118336-4"]);_gaq.push(['_setDomainName', 'samples.banchaproject.org']);_gaq.push(['_gat._anonymizeIp']);_gaq.push(["_trackPageview"]);(function(){var b=document.createElement("script");b.type="text/javascript";b.async=true;b.src=("https:"==document.location.protocol?"https://ssl":"http://www")+".google-analytics.com/ga.js";var a=document.getElementsByTagName("script")[0];a.parentNode.insertBefore(b,a)})();</script>
</body>
</html>
12行目からがSenchaのスタイルシートとスクリプトを読み込んでいる部分です。 どちらも「sencha-touch」フォルダから読み込んでいます。githubのディレクトリのようにsencha-touchフォルダを用意してやり、そこに必要なファイルを配置してやりましょう。
初めにダウンロードしたSenchaのソースファイルから、resourceフォルダ一式とsencha-touch-all-debug.jsファイルを以下にコピーしてやります。
/Applications/MAMP/htdocs/cake_test01/app/webroot/sencha-touch/
製品化する場合は圧縮バージョンのsencha-touch-all.jsを入れ、debug.jsは削除してください。
21行目からはBanchaの読み込みです。これらはスクリーンキャストでも言っているように、CakePHPが自動で生成してくれるようですので、配置などは行わなくていいようです。便利ですね。
最後に26行目でapp.jsを読み込みアプリのメインコードを生成しています。 ここまででlocalhost:8888にアクセスし起動すれば、一応動く画面は表示できます。ただ、CakePHPで書き出しているモデルが違うので、名前などのリストは表示されないはずです。Greetingの機能もエラーになります。(アラートは表示できると思いますが。)
今回は前回書きだしたBookモデルを利用して、著者の名前がこのリストに表示されるように少し改良してみたいと思います。
が、その前にこのapp.jsのダラダラ長いコードをクラス分けしてMVC構造に書き直しましょう。
app.jsをMVCに書き直す
まずは単純にViewを分けて書きだしてみましょう。
デモを見るとこのアプリはタブビューに4つのコンテンツが含まれている構造になっているのがわかります。
app.jsも長くて分かりづらいですが以下の様な構造になっているのがわかります。

したがって”Main(TabPanel)”、”Home”、”AuthorList”、”Greeting”、”About”の5つのクラスにviewを分けます。
/Application/MAMP/htdocs/cake_test01/app/webroot/にappフォルダを追加し以下のようにSenchaのデフォルトの配置を再現します。
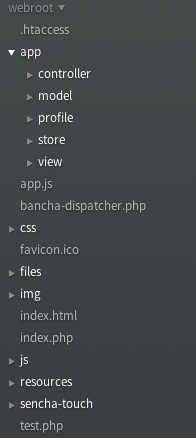
viewフォルダの中にHome.js、AuthorList.js、Greeting.js、About.jsを作り、現在app.jsに書いてある部分をそれぞれのファイルに分けていきます。
/* Home.js */
Ext.define('BanchaTouch.view.Home', {
    extend: 'Ext.Container',
    xtype: 'home',
    requires: [
    ],
    config: {
    	title: 'Home',
		iconCls: 'home',
		cls: 'home',
		scrollable: true,
        items: [
            {
				html: [
					'<img height="173" src="http://banchaproject.org//tl_files/Bancha/images/logo.png" />',
					"<p>This little App demonstrates how you can use Bancha with Sencha Touch 2</p>"
				].join("")
            }
        ]
    }
});
参照できるように「xtype:'home'」と指定しておきましょう。 他の部分もとりあえず分けちゃってください。
/* AuthorList.js */
Ext.define('BanchaTouch.view.AuthorList', {
	extend: 'Ext.List',
	xtype: 'authorlist',
	requires: [
	],
	config: {
		title: 'Store Sample',
		iconCls: 'star',
		cls: 'users',
		itemTpl: '<div>{name}</div>',
		store: Ext.create('Ext.data.Store', {
			model: Bancha.getModel('User'),
			autoLoad: true
		})
	},
	onItemDisclosure: (function() {
		var tpl = new Ext.XTemplate([
			'Name: {name}<br/>',
			'E-Mail: {email}<br/>',
			'Height: {height}cm<br/>'
		].join(''));

		return function(record, btn, index) {
			Ext.Msg.alert('Additional Information',tpl.apply(record.data),Ext.emptyFn);
		};
	}()),
	detailCard: {
		xtype: 'panel',
		scrollable: true,
		styleHtmlContent: true
	}
});
/* Greeting.js */
Ext.define('BanchaTouch.view.Greeting', {
    extend: 'Ext.form.Panel',
    xtype: 'greeting',
    requires: [
    ],
    config: {
    	title: 'Controller',
        iconCls: 'user',
        cls: 'controller',
        layout: 'vbox',

		items: [
			{
				xtype: 'fieldset',
				title: 'Exposed Remote Method',
				instructions: [
					'Just type in a name and get the appropriate greeting for the current day time.',
					'If your name is Judas the server will return with an unsucessfull response.'
					].join(''),

				items: [
					{
						xtype: 'textfield',
						label: 'Name',
						name: 'name',
						require: true
					}
				]
			},
			{
				xtype: 'button',
				text: 'Get Greetings',
				ui: 'confirm',
                handler: function() {

					// This looks up the items stack above, getting a reference to the first form it see
					var textfield = this.up('formpanel').down('textfield');

					if(textfield.getValue()) {
						// send the request to the server
						var unixTimestamp = (Date.now()/1000).toString();
						Bancha.RemoteStubs.Hello.getGreeting(unixTimestamp, textfield.getValue(),function(result) {
							// this is the result callback
							if(result.success) {
								Ext.Msg.alert("Greetings",result.data);
							} else {
								Ext.Msg.alert("Error","The server does not want to talk to you.");
							}
						});
					} else {
						Ext.Msg.alert("Name not defined", "Please write your name before asking for a greeting.",function() {
						   textfield.focus();
						});
					}
				}
			}
		]
    }
});
/* About.js */
Ext.define('BanchaTouch.view.About', {
    extend: 'Ext.Container',
    xtype: 'about',
    requires: [
    ],
    config: {
    	title: 'About Bancha',
		iconCls: 'info',
		cls: 'info',
		scrollable: true,
        items: [
            {
				html: [
					'<img height="85" src="http://banchaproject.org//tl_files/Bancha/images/logo.png" />',
					'<p style="height:85px; padding-top:20px;">Bancha makes creating Apps with a CakePHP backend beautifull and easy.</p>',
					'<p><br />The code can be found <a href="https://github.com/Bancha/BanchaTouchClient" target="_blank">on GitHub</a>.</p>',
					'<p>For more information go to <a href="http://banchaproject.org" target="_blank">banchaproject.org</a></p>'
				].join("")
            }
        ]
    }
});
これで4つのコンテンツを分解できました。
app.jsでタブのアイテムを、分解したファイルから読み込むように書きなおします。各クラスでxtypeを新たに指定しているので、その名前を参照するようにしましょう。以下の様にシンプルに記述することができます。
/* app.js */
Ext.application({
    name: 'BanchaTouch',

    icon: 'resources/images/iTunesArtwork.png',
    glossOnIcon: true,
    phoneStartupScreen: 'resources/loading/phone_startup.png',
    tabletStartupScreen: 'resources/loading/tablet_startup.png',

    launch: function() {

        if(Ext.browser.is('firefox') || Ext.browser.is('IE')) {
            alert('The Sencha Touch library doesn\'t support your current browser, please use Google Chrome or a smart phone instead.');
        }

        Ext.Viewport.add({
            xtype: 'tabpanel',
            fullscreen: false,
            tabBarPosition: 'bottom',
            ui: 'dark',
            items: [
                // This is the home page, just some simple html
                {
                    xtype: 'home'
                },

                // This page loads data from the CakePHP model User, using Bancha
                {
                    xtype: 'authorlist'
                },

                // This is the contact page, which features a form and a button. The button submits the form
                {
                    xtype: 'greeting'
                },
                // This is the home page, just some simple html
                {
                    xtype: 'about'
                }
            ],
            listeners: {
                painted: function() {
                    // if on the homescreen we have more space
                    if(Ext.Viewport.getWindowHeight() > 450) {
                        Ext.Viewport.addCls('big-screen');
                    }
                }
            }
        }); //eo viewport definition
    }
});
かなりスッキリしましたね。app.jsはタブパネルだけが残っている状態です。このタブパネルも一つのクラスに分解して別のファイルに書き出せます。Main.jsをviewフォルダ内に作って以下のように書きだしてください。
/* Main.js */
Ext.define('BanchaTouch.view.Main', {
    extend: 'Ext.TabPanel',
    xtype: 'main',
    requires: [
    	'BanchaTouch.view.Home',
    	'BanchaTouch.view.AuthorList',
    	'BanchaTouch.view.Greeting',
    	'BanchaTouch.view.About'
    ],
    config: {
    	fullscreen: false,
		tabBarPosition: 'bottom',
		ui: 'dark',
		items: [
			{
				xtype: 'home'
			},
			{
				xtype: 'authorlist'
			},
			{
				xtype: 'greeting'
			},
			{
				xtype: 'about'
			}
		]
    }
});
“requires“属性でどのファイルが必要かを指定しています。これを読み込み、「xtype:'home'」のように書くことでそのクラスを読み込むことができます。
Ext.Viewportの中身をすべて書き出せたので、app.jsがかなりスッキリしました。アプリが起動すると、Ext.Viewport.addの部分でMainを作るという処理を行うだけのプログラムになりました。ちなみに下部にあったlisteners属性は、画面の配置を調整するだけのものだったので消しちゃいました。
/* app.js */
Ext.application({
    name: 'BanchaTouch',

    icon: 'resources/images/iTunesArtwork.png',
    glossOnIcon: true,
    phoneStartupScreen: 'resources/loading/phone_startup.png',
    tabletStartupScreen: 'resources/loading/tablet_startup.png',

    launch: function() {

        if(Ext.browser.is('firefox') || Ext.browser.is('IE')) {
            alert('The Sencha Touch library doesn\'t support your current browser, please use Google Chrome or a smart phone instead.');
        }

        Ext.Viewport.add(Ext.create('BanchaTouch.view.Main'));
    }
});
だた、この状態ではまだ”BanchaTouch”と”Ext”がどこかコンピュータはわからないので、パスを設定してやらないといけません。
Ext.applicationに入る前に、以下のコードを書いてやります。
Ext.Loader.setPath({
    'Ext': 'touch/src',
    'BanchaTouch': 'app'
});
これで一応アプリは起動します。
/* app.js */
Ext.Loader.setPath({
    'Ext': 'touch/src',
    'BanchaTouch': 'app'
});

Ext.application({
    name: 'BanchaTouch',

    icon: 'resources/images/iTunesArtwork.png',
    glossOnIcon: true,
    phoneStartupScreen: 'resources/loading/phone_startup.png',
    tabletStartupScreen: 'resources/loading/tablet_startup.png',

    launch: function() {
        Ext.Viewport.add(Ext.create('BanchaTouch.view.Main'));
    }
});
少々長くなってきたので、一旦休憩。次回はコントローラを作って、Banchaからデータを読み込んでいきます。