BanchaとSencha Touch 2を統合する – Banchaモデルの使い方
コントローラの作成
前回、Bancha環境下にSenchaを設置する方法を解説しました。MVC構造にするためSenchaのViewを分けた所で終わっていたので、今回はControllerを作って行きたいと思います。
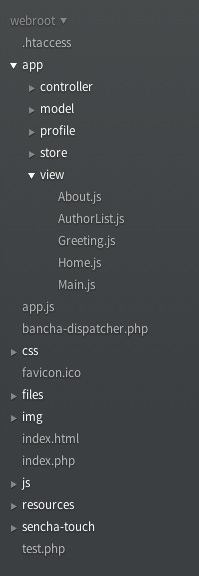
現在、以下のように/Applications/MAMP/htdocs/cake_test01/app/webroot/app/view内には前回作成したファイルが配置されていると思います。
今回はコントローラを作っていくので/Applications/MAMP/htdocs/cake_test01/app/webroot/app/controller/内にファイルを作ります。Main.jsというコントローラ用のファイルをcontrollerフォルダ内に作成してください。
今Viewのファイル内で処理している、ボタンなどの処理をまとめてこのMain.jsに書いて行きたいと思います。
以下のように、まずコントローラの基本形を書きましょう。
/* Main.js */
Ext.define('BanchaTouch.controller.Main', {
	extend: 'Ext.app.Controller',

	config: {
		refs: {
		},
		control: {
		}
	}
});
AuthorList.jsのアイテムタップアクション
今ViewのAuthorList.jsを見ると、”onItemDisclosure”の部分が、リストのアイテムをタップした時の処理であることがわかります。
/* AuthorList.js */
Ext.define('BanchaTouch.view.AuthorList', {
    extend: 'Ext.List',
    xtype: 'authorlist',
    requires: [
    ],
    config: {
        title: 'Store Sample',
        iconCls: 'star',
        cls: 'users',
        itemTpl: '<div>{author}</div>',
        store: Ext.create('Ext.data.Store', {
            model: Bancha.getModel('User'),
            autoLoad: true
        })
    },
    // ここからがタップした時のアクション
    onItemDisclosure: (function() {
        var tpl = new Ext.XTemplate([
            'Name: {name}<br/>',
            'E-Mail: {email}<br/>',
            'Height: {height}cm<br/>'
        ].join(''));

        return function(record, btn, index) {
            Ext.Msg.alert('Additional Information',tpl.apply(record.data),Ext.emptyFn);
        };
    }()),
    detailCard: {
        xtype: 'panel',
        scrollable: true,
        styleHtmlContent: true
    }
});
この”onItemDisclosure“の部分をごっそりコントローラに持って行きましょう。AuthorList.jsにはリストの矢印アイコンを表示させるために”onItemDisclosure:true“とだけして、config属性の中に入れておきます。”detailCard“の部分は今回は別にいらないので消してしまいます。
/* AuthorList.js */
Ext.define('BanchaTouch.view.AuthorList', {
    extend: 'Ext.List',
    xtype: 'authorlist',
    requires: [
    ],
    config: {
        title: 'Store Sample',
        iconCls: 'star',
        cls: 'users',
        itemTpl: '<div>{name}</div>',
        store: Ext.create('Ext.data.Store', {
            model: Bancha.getModel('User'),
            autoLoad: true
        }),
        onItemDisclosure: true
    }
});
コントローラの部分を書いて行きましょう。ref属性にAuthorList.jsのxtypeを指定して、参照できるようにします。
refs: {
   authorList: 'authorlist'
}
control属性は以下のようにします。
control: {
    authorList: {
        disclose: 'showDetail'
    }
}
このように書くことで、「authorListとしてrefで参照されているクラスのアイテムでdiscloseアクションが起こったら、showDetailを実行する」という処理を実現できます。したがってAuthorList.jsで書かれていた処理はshowDetail属性に書けばいいです。
この時、ストアからnameやemailなどのデータを取得し、アラートのテキストとして表示なければならないので、AuthorList.jsのストアでBanchaからとってきているデータを受け取らないといけません。
Senchaのドキュメントを見ると、discloseイベントはそれが発生した時にそのアイテムのrecordデータを自動で引数として渡してくれます。すなわち以下のように書けば、storeのデータをコントローラで使うことができます。
showDetail: function(list, record) {
        var tpl = new Ext.XTemplate([
            'Name: {name}<br/>',
            'E-Mail: {email}<br/>',
            'Height: {height}cm<br/>'
        ].join(''));

        Ext.Msg.alert('Additional Information',tpl.apply(record.data),Ext.emptyFn);
}
“record“の部分に、タップされたアイテムのストアデータが入ってきます。XTemplateでテンプレートを作り、tpl.apply(record.data)で取得したデータを設定しています。こうすることでnameやemailに具体的なテキストデータが入ります。
現在Main.jsは以下のようになっていると思います。
/* Main.js */
Ext.define('BanchaTouch.controller.Main', {
	extend: 'Ext.app.Controller',

	config: {
		refs: {
			authorList: 'authorlist'
		},
		control: {
			authorList: {
				disclose: 'showDetail'
			}
		}
	},
	showDetail: function(list, record) {
        var tpl = new Ext.XTemplate([
            'Name: {name}<br/>',
            'E-Mail: {email}<br/>',
            'Height: {height}cm<br/>'
        ].join(''));

        Ext.Msg.alert('Additional Information',tpl.apply(record.data),Ext.emptyFn);
	},
});
Greeting.jsのボタンタップアクション
/* Greeting.js */
Ext.define('BanchaTouch.view.Greeting', {
    extend: 'Ext.form.Panel',
    xtype: 'greeting',
    requires: [
    ],
    config: {
        title: 'Controller',
        iconCls: 'user',
        cls: 'controller',
        layout: 'vbox',

        items: [
            {
                xtype: 'fieldset',
                title: 'Exposed Remote Method',
                instructions: [
                    'Just type in a name and get the appropriate greeting for the current day time.',
                    'If your name is Judas the server will return with an unsucessfull response.'
                    ].join(''),

                items: [
                    {
                        xtype: 'textfield',
                        label: 'Name',
                        name: 'name',
                        require: true
                    }
                ]
            },
            {
                xtype: 'button',
                text: 'Get Greetings',
                ui: 'confirm',
                handler: function() {

                    // This looks up the items stack above, getting a reference to the first form it see
                    var textfield = this.up('formpanel').down('textfield');

                    if(textfield.getValue()) {
                        // send the request to the server
                        var unixTimestamp = (Date.now()/1000).toString();
                        Bancha.RemoteStubs.Hello.getGreeting(unixTimestamp, textfield.getValue(),function(result) {
                            // this is the result callback
                            if(result.success) {
                                Ext.Msg.alert("Greetings",result.data);
                            } else {
                                Ext.Msg.alert("Error","The server does not want to talk to you.");
                            }
                        });
                    } else {
                        Ext.Msg.alert("Name not defined", "Please write your name before asking for a greeting.",function() {
                           textfield.focus();
                        });
                    }
                }
            }
        ]
    }
});
Greeting.jsのボタンが配置されているのは31行目からの部分です。その中でhandlerという属性を作り、ボタンがタップされた時のアクションを書いています。ですので、このhandlerの部分がコントローラに移動できる部分です。handlerをごそっと消して、代わりにactionという属性を追加してやりましょう。属性値は”greeting“としておきます。
{
    xtype: 'button',
    text: 'Get Greetings',
    ui: 'confirm',
    action: 'greeting'
}
コントローラのMain.jsに移りましょう。control属性を以下のように変更してやります。
control: {
    authorList: {
        disclose: 'showDetail'
    },
    'button[action=greeting]': {
        tap: 'onGreeting'
    }
}
“button[action=greeting]“で、このアプリの中のボタンでgreetingアクションが割り振られているボタンを示し、tapイベントが発生したら”onGreeting”を実行するというように設定しています。
先ほどのshowDetailの下にonGreetingの処理も書いておきましょう。handler内でしていた処理をそのまま貼り付けてやります。
/* Main.js */
Ext.define('BanchaTouch.controller.Main', {
	extend: 'Ext.app.Controller',

	config: {
		refs: {
			authorList: 'authorlist'
		},
		control: {
			authorList: {
				disclose: 'showDetail'
			},
            'button[action=greeting]': {
                tap: 'onGreeting'
            }
		}
	},
	showDetail: function(list, record) {
        var tpl = new Ext.XTemplate([
            'Name: {name}<br/>',
            'E-Mail: {email}<br/>',
            'Height: {height}cm<br/>'
        ].join(''));

        Ext.Msg.alert('Additional Information',tpl.apply(record.data),Ext.emptyFn);
	},
	onGreeting: function() {
		// This looks up the items stack above, getting a reference to the first form it see
		var textfield = this.up('formpanel').down('textfield');

		if(textfield.getValue()) {
			// send the request to the server
			var unixTimestamp = (Date.now()/1000).toString();
			Bancha.RemoteStubs.Hello.getGreeting(unixTimestamp, textfield.getValue(),function(result) {
				// this is the result callback
				if(result.success) {
					Ext.Msg.alert("Greetings",result.data);
				} else {
					Ext.Msg.alert("Error","The server does not want to talk to you.");
				}
			});
		} else {
			Ext.Msg.alert("Name not defined", "Please write your name before asking for a greeting.",function() {
			   textfield.focus();
			});
		}
	}
});
しかし、このままでは29行目の部分でエラーが出てしまいます。thisがこのcontroller自体を指しているからです。
ここではテキストフィールドに入力された文字を取得したいので、refでそのテキストフィールドを参照して、ゲッタを作りましょう。
refs: {
    authorList: 'authorlist',
    textField: 'greeting > fieldset > textfield'
},
このように書くことで「greetingというxtypeのfieldsetの中のtextfieldを”textField”という名前で参照する」という事を設定できます。
したがって29行目は以下のように書きなおすことができます。
var textfield = this.getTextField();
以下がMain.jsコントローラの完成プログラムです。
/* Main.js */
Ext.define('BanchaTouch.controller.Main', {
	extend: 'Ext.app.Controller',

	config: {
		refs: {
			authorList: 'authorlist'
		},
		control: {
			authorList: {
				disclose: 'showDetail',
				textField: 'greeting > fieldset > textfield'
			},
            'button[action=greeting]': {
                tap: 'onGreeting'
            }
		}
	},
	showDetail: function(list, record) {
        var tpl = new Ext.XTemplate([
            'Name: {name}<br/>',
            'E-Mail: {email}<br/>',
            'Height: {height}cm<br/>'
        ].join(''));

        Ext.Msg.alert('Additional Information',tpl.apply(record.data),Ext.emptyFn);
	},
	onGreeting: function() {
		// This looks up the items stack above, getting a reference to the first form it see
		var textfield = this.getTextField();

		if(textfield.getValue()) {
			// send the request to the server
			var unixTimestamp = (Date.now()/1000).toString();
			Bancha.RemoteStubs.Hello.getGreeting(unixTimestamp, textfield.getValue(),function(result) {
				// this is the result callback
				if(result.success) {
					Ext.Msg.alert("Greetings",result.data);
				} else {
					Ext.Msg.alert("Error","The server does not want to talk to you.");
				}
			});
		} else {
			Ext.Msg.alert("Name not defined", "Please write your name before asking for a greeting.",function() {
			   textfield.focus();
			});
		}
	}
});
忘れないように、このアプリを起動した時にコントローラ参照するようにしましょう。app.jsにcontrollers属性を追記してください。
Ext.application({
    name: 'BanchaTouch',

    controllers: ['Main'],
以上でapp.jsの整理ができ、MVC構造に配置できました。
Banchaの使い方
ここからはBanchaの機能を使っている部分を見ていき、前々回で書きだしたBookモデルをこのプログラム内で使ってみようと思います。
このアプリではまず、AuthorList.jsのアイテムを作成するためにBanchaのモデルを使っています。AuthorList.jsに以下のような記述があります。
store: Ext.create('Ext.data.Store', {
    model: Bancha.getModel('User'),
    autoLoad: true
})
通常はここでstoreフォルダ内に作ったストアデータを呼び出します。また、その際modelフォルダ内のモデルファイルにアクセスしてストアデータを読み込む方法を取得します。これらの処理をこの記述はBanchaのモデルにアクセスするだけで行なっています。proxyの設定や、modelのfieldの設定はBanchaが自動で行なってくれます。
今回は”User”というモデルは作成していないので、このままでは何も読めません。この代わりに前々回に書きだした”Book”モデルを読み込んでみましょう。
store: Ext.create('Ext.data.Store', {
    model: Bancha.getModel('Book'),
    autoLoad: true
})
これだけでOKです。ではBookの参照しているテーブル、booksの要素をリストのアイテムとして表示してみましょう。
現在AuthorList.jsのitemTplはnameというフィールドを表示しています。
itemTpl: '<div>{name}</div>',
このnameはBanchaが自動でテーブルのカラム名をフィールド名にしたものです。booksテーブルはnameカラムがないのでこのままでは、何も参照できません。著者の名前のカラムを出すようにしましょう。
そのためにはこの部分をカラム名のauthorにするだけです。CakePHPでBookモデルを作成した時にauthorフィールドが自動で生成されているので、参照することができます。
itemTpl: '<div>{author}</div>',
リストアイテムをタップした時に出るアラートの文字も変えてやりましょう。
booksテーブルには、author、title、publish_dateの項目が作ってあるので、それらを代わりに表示するようにコードを変更します。コントローラのMain.jsを開き、アラートのテンプレートを作っている部分を変更してください。
var tpl = new Ext.XTemplate([
            'Name: {author}<br/>',
            'Title: {title}<br/>',
            'Publish Date: {publish_date}<br/>'
        ].join(''));
Greeting.jsのViewでもボタンを押すと、ポップアップが現れます。テキストフィールドに入力された文字を読み込み、データベースにある名前なら挨拶をする機能です。この部分の処理もBanchaを使っています。
今回のCakePHPではBanchaコントローラを書き出していないので正常に動作しません。
ただ、以下の部分がBanchaのコントローラメソッドを利用している部分です。
Bancha.RemoteStubs.Hello.getGreeting(unixTimestamp, textfield.getValue(), function(result) {
    // this is the result callback
    if(result.success) {
        Ext.Msg.alert("Greetings",result.data);
    } else {
        Ext.Msg.alert("Error","The server does not want to talk to you.");
    }
});
HelloコントローラのgetGreetingメソッドを利用するという意味になります。Helloコントローラを書きだして、その中にgetGreetingという名前を照合するメソッドを作ってやれば、このようにSencha内でBanchaのコントローラを使用することができます。
半端になりましたが、3回に渡ってBanchaとSenchaを統合開発する方法の基礎の基礎を解説しました。
また時間があったら、コントローラの書きだしや、Developer API Documentの書き方、参照の仕方なども書いいていきたいなと思います。